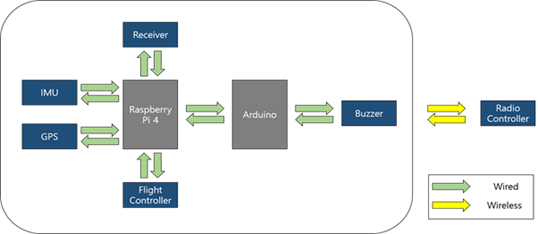
이 프로젝트는 PPM 변환 신호를 통해 GEO FENCE 기술을 구현하는 것입니다. 따라서 컨트롤러 신호(PPM) 신호가 라즈베리 파이에서 픽스호크로 전송되어 GEO FENCE를 활성화합니다. 픽스호크의 경우, 제어 신호에 따라 비행하는 것과 동일하게 됩니다.
아래 그림은 시스템의 개략도입니다. 그림에서 보듯이, PPM 신호는 직접 플라이트 컨트롤러로 받아와서 전송되는 것이 아니라 라즈베리 파이를 통해 전송됩니다. 이 때 라즈베리 파이에서 Geo Fence 내부라면 입력으로 받은 PPM 신호를 그대로 플라이트 컨트롤러로 전송합니다. 그러나 GEO 펜스 외부라면 입력으로 받은 PPM 신호가 아닌 제어 루프를 통해 새로운 신호를 플라이트 컨트롤러로 전송합니다.
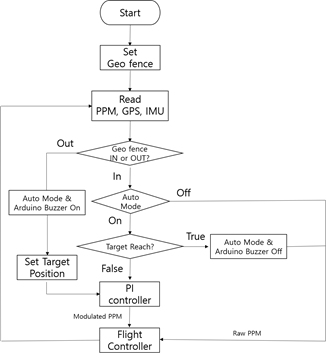
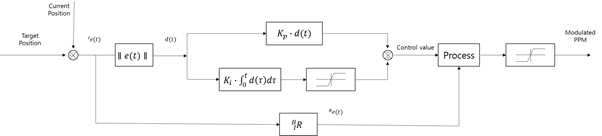
제어는 PI 제어를 사용하여 수행되었습니다. 이 때 P 게인은 크게 설정하였습니다. 이것은 정확한 위치에 오기보다는 대략적인 방향으로 GEO FENCE 내로 들어오는 것이 주요 목표이기 때문입니다. P와 I 게인을 더 정확하게 찾으면 더 상세한 제어가 가능할 것입니다.
실제 테스트 전에 Gazebo와 px4 HITL을 사용하여 시뮬레이션 비행을 수행하였습니다. 시뮬레이션에서는 제어가 잘 되었습니다. 드론이 설정된 Geo Fence를 벗어났을 때, 어느 방향에서든 잘 돌아오는 것을 확인하였습니다.

Simulation Test
1) starting
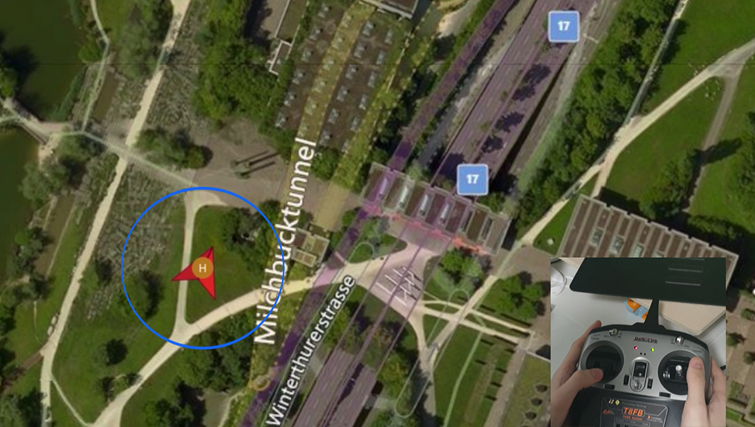
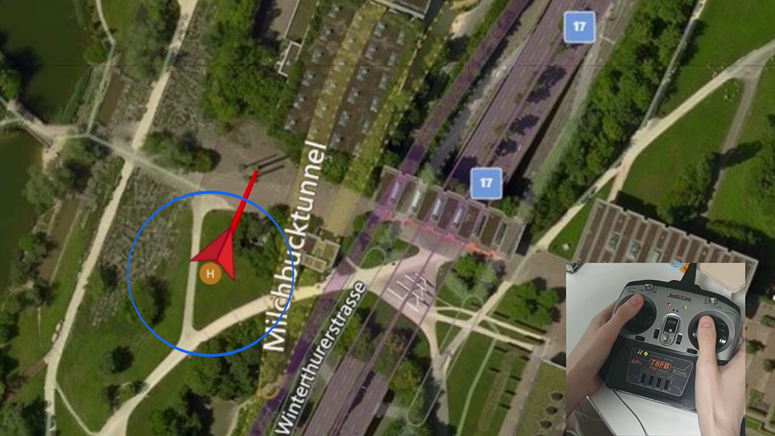
Geo Fence를 설정할 수 있습니다. 파란색 선은 설정된 Geo Fence를 나타냅니다.
2) INSIDE GEO FENCE

Geo Fence 내부에서는 제어 신호에 따라 비행합니다.
3) OUTSIDE GEO FENCE

Geo Fence 외부에서는 컨트롤러 신호가 무시됩니다. Geo Fence 내부에 목표점을 지정한 후, GPS 센서를 통해 오차 거리를 계산합니다. 이 오차 거리를 기반으로 PI 제어를 통해 쓰로틀과 드론의 기울기 정도를 결정합니다. 현재 자세는 IMU 센서와 EKF를 통해 추정하며, 이를 기반으로 롤과 피치의 회전 비율을 계산합니다. 이를 통해 드론이 Geo Fence 내부로 들어갈 수 있습니다.
4) Inside Geo Fence
Geo Fence 내부의 목표 지점으로 돌아와서, 3초 이상 목표 지점까지의 거리가 0.2m 이하인 경우, 자율 주행 모드가 꺼지고 컨트롤러 신호 우선 모드로 돌아갑니다. 그 후 컨트롤러 신호를 기반으로 Geo Fence 내부에서 비행할 수 있습니다.
Hardware Overview
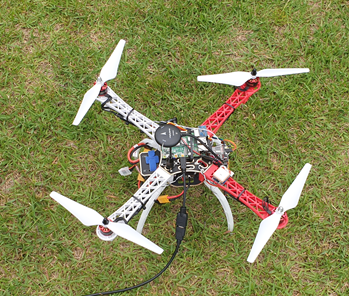

| NO | Name | Manufacturer | Function |
| 1 | Raspberry Pi 4 | Raspberrypi foundation | Main Computer |
| 2 | Arduino uno | arduino.cc | Safety alarm system |
| 3 | MPU 9250 | invensense | 9-axes IMU sensor |
| 4 | NEO-7 | U-blox | GPS |
| 5 | T8FB | radiolink | Radio RX/TX |
| 6 | KP12-G185A | soricom | Buzzer |
Project Source code
Source Code Link: https://github.com/kws1611/capstone2020.git
Simulation Testing Video
Video Code Link : https://youtu.be/1OroQyp9Y-I
Actual Testing Video
Video Code Link : https://youtu.be/L7eE2ov9xuc